

In case you’re not familiar, Google Search Console is a free service that assists in monitoring and maintaining a website’s presence in Google’s search results. Formerly known as Webmaster Tools, its name changed to Search Console back in May, and if you’re anything like me you are still getting used to it.
Why Use Google Search Console?
Before adding your website to Search Console, it’s important to know a few basic reasons why most digital marketing agencies use the tool and why you should too.
- Ensure Google can easily access the content on your website.
- Submit new content to be crawled.
- See which search queries caused your website to appear in the search results.
- See what sites are linking to your website.
- Identify crawl errors to be fixed.
Click here to see more reasons and other information about Search Console.
Now let’s get started.
Step 1: Verification
Log into your Google account. If you’re using Google Analytics on your website, it’s a good idea to log into the same Google account. Once logged in, search for “search console” from your browser or click here.
Once on the main Search Console page, click the “Add A Property” button and enter your website’s domain name. We recommend that you set up both the www and non-www versions of your website (http://xyz.com and http://www.xyz.com).
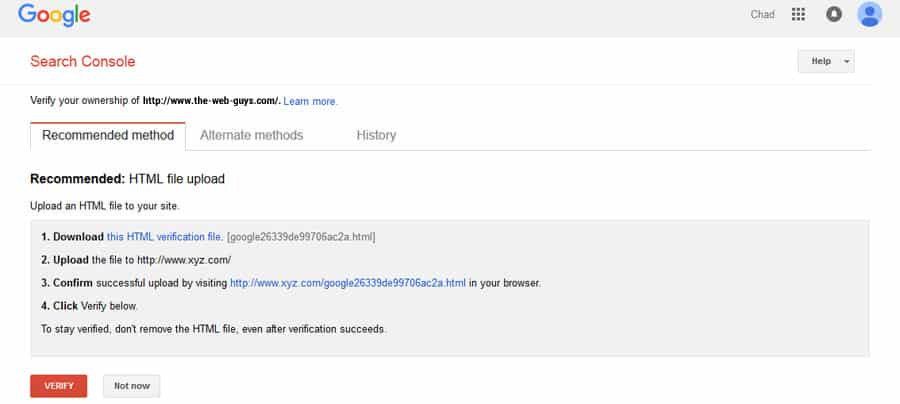
Next, you’ll be prompted to choose your verification method. Google recommends uploading an HTML file to your website. This is the method we use at The Web Guys, but there are alternative options available that include verifying through an HTML tag, domain name provider, Google Analytics, and Google Tag Manager. Once you’ve chosen a method and followed the instructions, click the “Verify Now” button.
Your website is verified! Now it’s time to go to the Search Console dashboard and begin configuring the settings.
Step 2: Submitting a Sitemap
Among other reasons, sitemaps are important because they help tell Google what pages and posts are on your website. Think about a table of contents in a book. Helpful, right?
Navigate to “Sitemaps” under the “Crawl” menu of the dashboard. I’ll touch on this in Step 4, but if your preferred domain is the www version, then add the sitemap in that account. Click the “Add/Test Sitemap” button, enter the URL of your sitemap, and submit it. The Search Console will tell you pretty quickly if there are any errors with your sitemap.
Check back in a few days to see how many pages of your website Google has indexed.
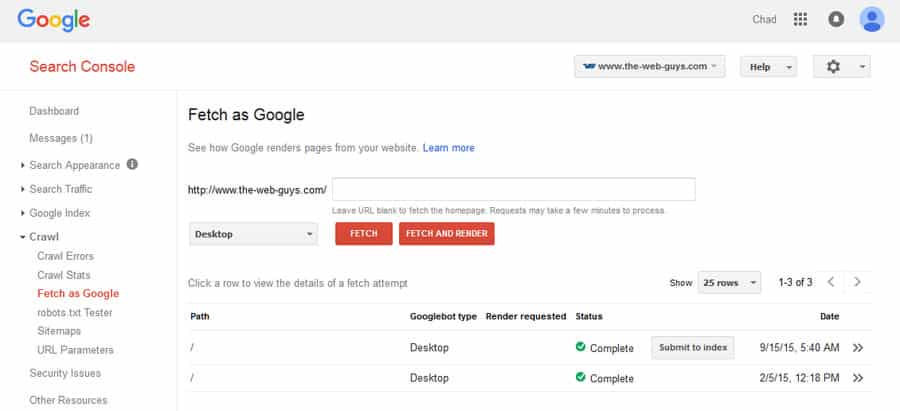
Step 3: Fetch as Google
The “Fetch as Google” function is a way to expedite Google learning that your website exists or has undergone major changes recently. Also found under the “Crawl” menu, you’ll want to click the “Fetch” button and then “Submit to Index.”
Step 4: Other Site Preferences
The Search Console provides a way of communicating site preferences to Google. One of these preferences is International Targeting. This setting is used to help Google provide the best search results based the geographic target of a business and the intent of searchers. For example, if you operate a home remodeling company in Bemidji, MN, and work only with local clients, then targeting the United States is the right choice. If your business caters to clients in the United States, Germany, and Holland, then you’re better off not setting a country.
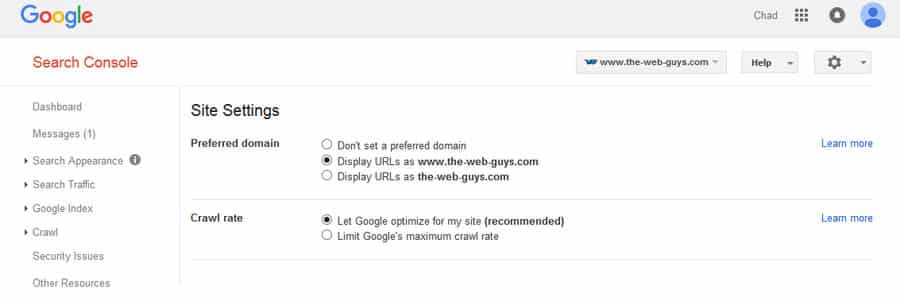
The last setting I’ll cover in this article is the Preferred Domain. On the top right of the Search Console page, click on the “gear” icon and select “Site Settings.” This is where you’ll tell Google your preference between the www versus non-www version of your website. Once set, Google will consider links to either version of the domain to be the same. This is a very important step in avoiding duplicate content.
You’re ready!
Now that you’ve completed the site verification and basic settings inside Search Console, you’re ready to begin assessing. For more information about settings and features, view the Search Console Help Center.
Images via Google